Free No-Sew Amigurumi Cat Crochet Pattern
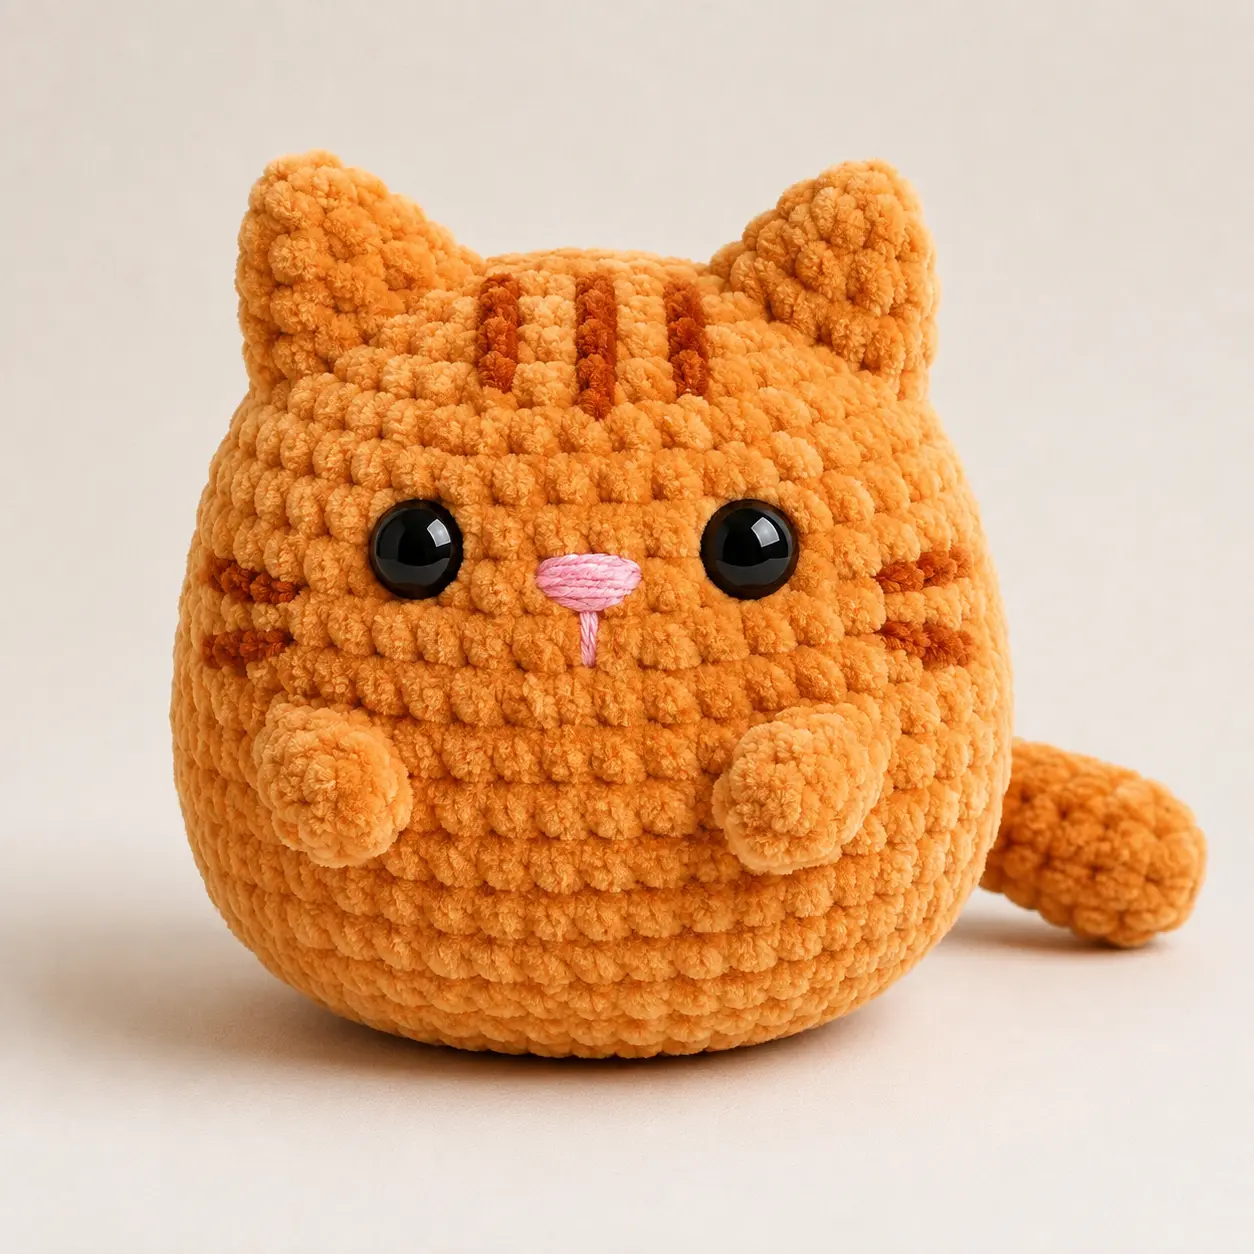
If you're looking for the ultimate quick crochet project that is irresistibly cute, beginner-friendly, and completely no-sew, you've found it! This adorable plush cat works up in one seamless piece, making it a perfect weekend project for crocheters of all skill levels.
The no-sew plush trend has exploded across Pinterest, TikTok, and Instagram - and it's easy to see why. Soft, round animals made with plush chenille yarn are incredibly satisfying to crochet, require minimal finishing work, and make fantastic handmade gifts. Even better, they are among the best-selling crochet items at local craft fairs because of their squishy texture and charming expressions.
This little cat features a chubby body, tiny paws, adorable pointed ears, and a cute little tail - all crocheted directly into the body without attaching separate pieces. That means less sewing, fewer loose parts, and more time enjoying your finished creation.
Whether you're using leftover velvet yarn from previous projects or making an entire family of colorful cats, this pattern is designed to be fun, fast, and rewarding from start to finish.
Skill Level & Prerequisites
Skill Level: Easy / Beginner-Friendly
This pattern is ideal for confident beginners who already know the basic crochet stitches.
You'll need to be familiar with:
- Magic Ring (MR)
- Single Crochet (sc)
- Increase (inc)
- Invisible Decrease (dec)
- Chain stitch (ch)
- Slip Stitch (sl st)
- Working in continuous rounds
- Basic color changes (optional)
- Simple shaping techniques
Materials & Tools Needed
- Super Bulky (#6) Velvet or Chenille Yarn in:
- Ginger (orange)
- Gray
- White
- Small amount of pink yarn or embroidery floss
- 4.5 mm or 5.0 mm crochet hook
- 10 mm or 12 mm safety eyes
- Polyester fiberfill stuffing
- Stitch marker
- Scissors
- Tapestry needle
- Measuring tape (optional)
Finished size:
Approximately 4–5 inches (10–13 cm) tall using super bulky chenille yarn.
Abbreviations Used
| Abbreviation | Meaning |
|---|---|
| MR | Magic Ring |
| Sc | Single Crochet |
| Inc | 2 sc in same stitch |
| Dec | Invisible Decrease |
| Ch | Chain |
| Sl St | Slip Stitch |
| St | Stitch |
| Sts | Stitches |
Step-by-Step Crochet Pattern Instructions
Work in continuous rounds unless otherwise noted.
Body
Round 1
6 sc in MR.
(6 sts)
Round 2
Inc in each stitch around.
(12 sts)
Round 3
(Sc, Inc) × 6.
(18 sts)
Round 4
(2 sc, Inc) × 6.
(24 sts)
Round 5
Sc around.
(24 sts)
Round 6
(3 sc, Inc) × 6.
(30 sts)
Round 7
Sc around.
(30 sts)
Round 8
Sc around.
(30 sts)
Round 9
(4 sc, Inc) x 6.
(36 sts)
Round 10
Sc around.
(36 sts)
Round 11
Sc around.
(36 sts)
Insert Safety Eyes
Place the 10-12 mm safety eyes between Rounds 8 and 9, approximately 7 stitches apart.
Do not attach the backs until you're happy with the placement.
Tiny Front Paws (No-Sew)
Round 12
Sc 7.
Paw 1
Ch 3.
Working back down the chain:
- Sc in 2nd chain from hook.
- Sc in next chain.
- Sl st into the same body stitch where the chain began.
Continue:
Sc 14.
Paw 2
Repeat:
- Ch 3
- Sc in second chain
- Sc in next chain
- Sl st into same body stitch
Sc remaining 7.
(36 sts around body plus two paw loops)
Round 13
Sc around, crocheting behind the paw loops.
(36 sts)
Round 14
(4 sc, Dec) x 6.
(30 sts)
Round 15
Sc around.
(30 sts)
Begin Stuffing
Firmly stuff the body.
Continue adding stuffing as you work upward.
Round 16
(3 sc, Dec) x 6.
(24 sts)
Round 17
Sc around.
(24 sts)
Crochet the Pointed Ears
Round 18
Sc 4.
Ear 1
Ch 3.
Working back:
- Sc in second chain.
- Sc in next chain.
- Sl st into same body stitch.
Continue:
Sc 10.
Ear 2
Repeat:
- Ch 3
- Sc in second chain
- Sc in next chain
- Sl st into same stitch.
Sc remaining 10.
(24 sts plus two ears)
Round 19
Sc around behind ear loops.
(24 sts)
Shape the ears gently with your fingers after completing the round.
Round 20
(2 sc, Dec) x 6.
(18 sts)
Add additional stuffing.
The head should feel pleasantly firm.
Round 21
(Sc, Dec) x 6.
(12 sts)
Crochet the Tail
Round 22
Sc 5.
Ch 7.
Working back:
- Sl st in second chain from hook.
- Sl st in each remaining chain.
Sl st into same body stitch.
Continue:
Sc 7.
(12 sts plus tail)
Round 23
Dec around.
(6 sts)
Fasten off, leaving a short tail.
Thread the yarn through the front loops of the remaining stitches.
Pull tightly to close.
Hide the yarn tail inside the body.
Finishing Touches
Your no-sew cat is almost finished!
Embroider the Nose
Using pink embroidery floss or lightweight yarn:
- Stitch a small upside-down triangle centered between the eyes.
- Add one short vertical stitch beneath the nose.
- Optional: embroider tiny whiskers with gray or white thread.
Shape the Ears
Pinch each crocheted ear gently between your fingers to create crisp little points.
Final Stuffing Check
Massage the plush slightly to distribute stuffing evenly.
Add more stuffing through the closing hole if needed before tightening the final round.
Hide Yarn Ends
Use a tapestry needle to weave all yarn tails through the stuffing.
Trim close to the fabric so they disappear inside the plush.
Your finished cat should have:
- Squishy round body
- Cute pointed ears
- Tiny dangling paws
- Curled little tail
- Sweet embroidered pink nose
- Completely seamless construction with zero sewing
Tips for Success
- Plush chenille yarn hides stitches, so use a stitch marker every round.
- Keep your tension consistent for an even, polished finish.
- Stuff firmly for the signature chubby "kawaii" shape.
- Experiment with different yarn colors to create tabby, tuxedo, calico, or solid-colored cats.
- Make several in different colors for gifts, keychain charms, nursery decor, or craft fair inventory.
Why You'll Love This Pattern
- ✅ Completely no-sew construction
- ✅ Beginner-friendly
- ✅ Fast one-evening project
- ✅ Perfect stash buster
- ✅ Soft, squishy plush design
- ✅ Great for gifts and craft fairs
- ✅ Uses only basic crochet stitches
- ✅ Minimal finishing work